
We often ask teachers who receive donations on our site to send in photos of their classrooms and students as a way to thank their generous corporate sponsors and donors. Photos connect your supporters directly to your classroom. When they see the positive impact they had on your students, they’re motivated to give again!
We know that protecting student privacy is one of the many responsibilities teachers have to ensure their students are safe. And, we understand that taking and sharing photos of students can feel overwhelming.
We’re here to help with four tips so you can take great photos and protect student privacy.
Tip #1: Avoid including students’ faces in your photos.
There are many ways you can take great photos of your students without revealing their identities.
Here are three ways, with examples:
1. A photo of the back of your students’ heads, or in profile, while they’re busy with schoolwork.
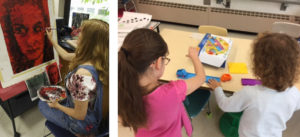
2. A photo that includes your students’ hands only. They could be holding supplies you purchased with your donation.
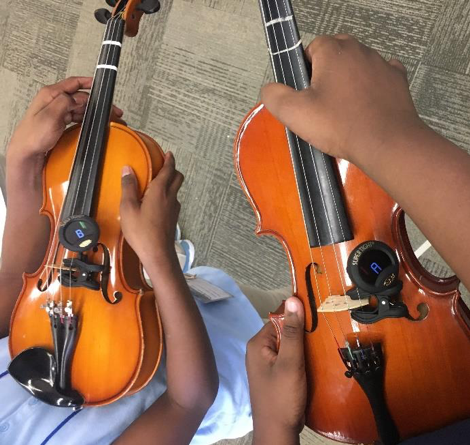
3. A photo of your students’ creatively hiding their faces. As in example 2, they could be holding supplies you purchased with your donation.

Keep in mind that we share your photos with your donor or sponsor. These examples are so great because they show what was purchased, or highlight a handmade thank-you note that shows how much the donation meant to the students.
Tip #2: If you include students’ faces, get a signed release form for each student.
We love it when teachers send in photos that capture the smiling faces of their students. However, we highly encourage teachers who share these photos with us to also include a completed photo release form for each student in the photo whose face is visible.
You can download the release form here. Need a copy in Spanish? You can find it here.
We ask that you complete our release form because even if your school has its own photo policy in place, these policies unfortunately do not apply to AdoptAClassroom.org’s potential usage of the photos. For example, we may want to use your photos on our social media channels or website to raise awareness of our mission or encourage donations.
Here are some great photos that do include students’ faces. Their teachers were able to obtain release forms and identified the students’ names:

Tip #3: Take and share a quality photo
Before you take a photo, make sure your camera or phone is in the landscape orientation. Photos in the landscape orientation are best when capturing your classroom or a group of your students.
When you look through your camera lens or at your phone screen, pay attention to the lighting in the room. If it’s too dark or too bright, consider a different location for your photo, or adjust the lighting in the room. If it’s an option, natural light is always best.
When you’re ready to share your photos with us, send a digital copy via email to ensure the best quality. Your file(s) should be in JEPG or PDF format.
If there are students in your photos, list their first names in order of appearance from left to right within your email, if possible.
Tip #4: Not sure if your photos meet the criteria?
We’re here to help. Contact us at [email protected] or 1.877.384.0764.